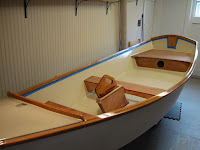
Here is part two of my attempt to catch the blog up with the progress of my Jimmy Skiff ™ project. The picture above shows the current state of my boat. I have painted and varnished, but have more coats of varnish to apply and a little more painting to do where the tape is on the deck. This will be the same Jade Green color as the hull. I had tried the Grand Banks Beige on the deck, but did not like the way it was so close to the interior Sandtone color. So, I sanded it off and decided on the Jade Green and to varnish most of the deck surface.
 There where a couple of lingering tasks which required that I mix up some more epoxy, but since the work needed to be done on the bottom of the hull, I left this until I had finished painting the interior, so that I wouldn't have to turn the boat over more than necessary. The photo on the right shows how I used silica thickened epoxy to fill in over the counter-sunk stainless steel screws going through the hull, and into the bottom of the mast step.
 I added more fiberglass and epoxy to reinforce / protect the skeg and the area around the dagger slot. I figured that these areas will likely take the most abuse, and wrapping the inner edges of the dagger slot seemed like cheap insurance against springing a leak there.
 This is what it looked like after a few coats of unthickened epoxy and a little scraping in between. It blended pretty well considering the thickness of the fiberglass tape.
 After the epoxy cured, I moved the hull outdoors and washed it down with water and household ammonia to ensure that there would not be any problems with the amine blush that can occur with epoxy cures. I had run out of the slow cure epoxy which does not blush, so I used the fast cure hardener that I had on-hand. This hardener can leave a residue on the surface as a result of the curing process, known as amine blush. The residue will interfere with proper paint and varnish adhesion. Fortunately, it is water soluble, and can be washed off prior to painting.
The images below show additional work completed. Hover your cursor over each one to see a description. Clicking on an image will open the picture in a larger size. I have added an index at the bottom of the page for easy access to the prior posts by title.


No comments:
Post a Comment